
V-Ray for Rhino Guide: Creative Rendering Essentials 2026
Unlock a new era of architectural visualization with V-Ray for Rhino, the leading solution for creative, photorealistic rendering in 2026. Whether you are an architect or designer, this guide will help you master essential tools and advanced workflows.
Discover how to set it up, navigate its intuitive interface, and harness industry-leading material and lighting techniques. Learn to optimize your workflow for speed and quality, and stay ahead with insights into future trends.
Ready to elevate your renderings? Explore practical strategies and actionable steps that empower you to deliver stunning results with confidence.
Getting Started with V-Ray for Rhino
Starting your journey with V-Ray begins with ensuring your system is ready for high-quality rendering. Whether you are a seasoned architect or an ambitious designer, understanding the technical requirements is the first step to a smooth experience.
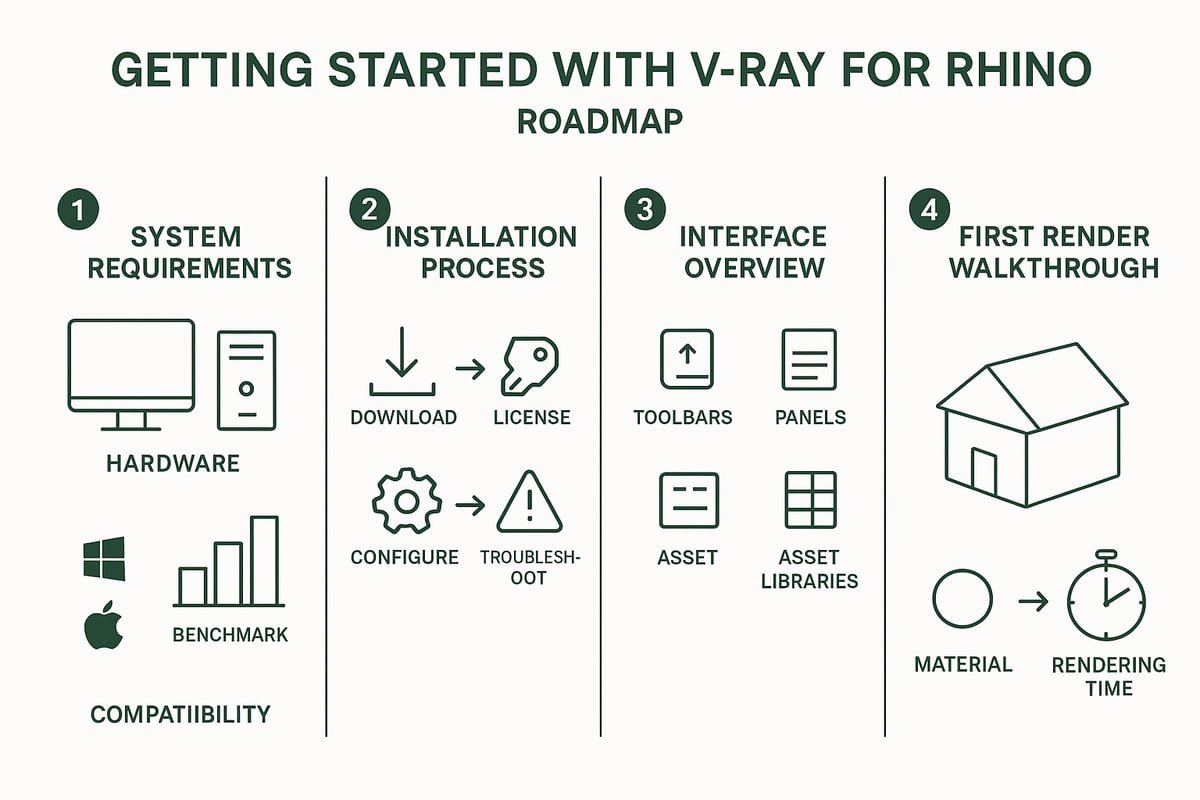
System Requirements and Compatibility
Before installing the software, verify that your hardware and software meet the latest standards. For 2026, modern workstations typically feature multi-core CPUs, at least 32GB of RAM, and advanced GPUs with ray tracing support. Rhino 8 and Windows 11 are widely recommended, while Mac support continues to improve.
Comparing CPU and GPU rendering is essential. GPU rendering often accelerates workflows, but some tasks still benefit from CPU reliability. Leading architecture firms report that GPU rendering can cut project times by up to 40 percent compared to CPU alone.
If you need specifics, consult the Rhino 8 System Requirements for a detailed compatibility checklist. Avoid common pitfalls like outdated drivers or insufficient RAM to prevent setup delays.
Installation and Setup Process
Installing is straightforward when you follow a step-by-step plan. Begin by downloading the correct installer for your Rhino version. Next, choose your preferred licensing method—online activation or dongle. Enter license details during setup to avoid interruptions.
Configure toolbars and plugins after installation for a seamless workflow. Adjust preferences for rendering defaults and asset locations early on. Should you face issues, check error messages and consult the official documentation for targeted solutions.
Some users report conflicts with antivirus software or network restrictions during activation. Temporarily disabling certain protections can resolve these issues, ensuring it runs smoothly from the start.
Navigating the V-Ray Interface in Rhino
The interface integrates directly with Rhino’s environment, offering intuitive access to powerful rendering tools. The main toolbars and panels include the Asset Editor, Frame Buffer, and Light Lister. These can be arranged to fit your personal workflow.
Customizing your workspace increases efficiency. Dock frequently used panels and create shortcuts for common actions. Access the core rendering controls and material libraries from the Asset Editor for quick adjustments.
A well-organized interface speeds up navigation and reduces repetitive actions. For example, grouping lighting tools together can help you switch between settings without losing focus on your model.
First Render: Quickstart Walkthrough
Start by importing a simple Rhino model, such as a basic room or building exterior. Apply default materials and set up basic lighting using the Sun & Sky system.
Initiate the render with optimal default settings. On a modern workstation, expect a draft-quality image in just a few minutes. Review the output in the Frame Buffer and save your image in the desired format.
Typical rendering times vary based on scene complexity, but even high-detail models can be previewed quickly. This rapid feedback empowers you to iterate and refine your design efficiently.
Mastering Materials and Textures
Photorealistic rendering starts with mastering materials and textures. Whether you are visualizing glass façades or intricate wood details, understanding how V-Ray for Rhino handles surface representation is essential. This section explores essential workflows, from material basics to advanced texturing and troubleshooting, giving you the tools to elevate your renders.
Understanding Material Types
In V-Ray for Rhino, you can choose from several core material types: standard, physical, and layered materials. Each serves unique needs in architectural visualization.
For example, simulating glass with physical materials allows for true-to-life reflections, while metals benefit from layered setups for weathered finishes. Materials differ from Rhino’s native ones by offering deeper control over light interaction, essential for realism.
Creating Realistic Surfaces: Texturing Techniques
To achieve lifelike results, accurate texture mapping is key. Start by applying high-resolution textures to your model, then use mapping tools to adjust scale and orientation. For added surface detail, employ bump, normal, or displacement maps.
Consider this workflow for photorealistic wood:
Import a seamless wood texture
Adjust UV mapping to align grain direction
Add a bump map for tactile depth
For concrete, combine roughness and normal maps to replicate natural imperfections. Always check UV mapping to prevent stretching, and keep textures organized for efficiency in V-Ray projects.
Advanced Material Editing and Customization
The node-based material editor in Rhino enables custom shader creation. Use nodes to combine textures, adjust reflection and refraction, and introduce effects like subsurface scattering for translucent materials.
For frosted glass:
Set base material to physical
Add a noise map to the roughness channel
Tweak refraction to balance clarity and diffusion
Adjusting these parameters lets you simulate anything from polished marble to translucent plastics. With Rhino, you have granular control, ensuring each surface matches your creative vision.
Asset Libraries and Material Management
Efficient material management starts with leveraging built-in and external asset libraries. Access V-Ray Cosmos for curated materials, or import third-party assets for specialized needs. Organize materials by project and type to streamline workflow.
Batch editing tools allow you to update multiple materials simultaneously, saving time on large projects. For a comprehensive workflow, refer to the Complete guide to 3D architectural rendering, which expands on asset sourcing and management strategies compatible with V-Ray for Rhino.
Troubleshooting Material Issues
Common material problems include missing textures, incorrect scaling, and render artifacts. Use these steps to resolve issues:
Check texture file paths and relink missing assets
Verify UV mapping to fix scale discrepancies
Adjust material parameters to eliminate artifacts
Case studies show that resolving missing textures often involves updating asset links after moving project folders. For persistent render artifacts, lowering reflection intensity or tweaking displacement settings in V-Ray for Rhino typically resolves the problem.
Material Optimization for Fast Rendering
Optimizing materials in V-Ray for Rhino balances realism with performance. Reduce material complexity by limiting the number of reflection and refraction layers. Manage texture resolution, using high-res images only where needed.
In large architectural scenes, swap heavy textures for lower-res versions in background elements. This strategy maintains visual quality while shortening render times. By controlling material detail, V-Ray for Rhino delivers both efficiency and photorealistic results, even on demanding projects.
Lighting Techniques for Creative Rendering
Lighting is the backbone of compelling visualizations with V-Ray for Rhino. Mastering lighting transforms basic models into immersive, photorealistic scenes that captivate clients and stakeholders alike. In this section, we explore essential lighting techniques, from choosing the right light sources to fine-tuning color and avoiding common pitfalls, ensuring your renders stand out in 2026.
Types of Lights
V-Ray for Rhino offers a diverse array of lighting options tailored to different architectural needs. Whether you aim for realism or a stylized effect, selecting the right type of light is crucial.
Architects often blend these to create both realistic and artistic effects. For a deeper dive into the creative process, see the Art of architectural rendering. With V-Ray for Rhino, you can experiment, compare daylight and night scenes, and discover which lighting mix best supports your design intent.
Setting Up Daylight and Natural Lighting
The Sun & Sky system lets you simulate real-world conditions with precision. Start by enabling the V-Ray Sun and setting geolocation to match your project's real site.
Adjust the time of day to see how light shifts, casting dynamic shadows and changing color temperature. This is invaluable for studying building exteriors and predicting real-world performance. Use a combination of Sun and Sky to achieve balanced, realistic lighting.
For optimal results, test different sun angles and sky turbidity. This approach ensures your scenes accurately reflect the desired environment, enhancing both presentation and technical credibility.
Artificial Lighting for Interiors
Interior scenes demand careful placement of artificial light. Spot, area, and point lights each serve specific functions. Use spotlights for focused highlights, area lights for soft illumination, and point lights for general ambiance.
Incorporate IES profiles to mimic real-world fixtures, adding authenticity to kitchens, offices, or hospitality spaces. Layer multiple light sources to avoid flat or unrealistic results.
Test your lighting setup with quick preview renders. This helps you fine-tune intensity, color, and placement, ensuring interiors feel vibrant and welcoming.
HDRI Lighting and Environmental Effects
HDRI maps are essential tools for achieving nuanced sky and ambient lighting. Load an HDRI environment to wrap your scene in realistic, high-dynamic-range light.
Balance HDRI sources with artificial lights for depth and atmosphere. For example, an early morning HDRI combined with soft interior lights can create a moody, inviting space.
Experiment with different HDRI images to match the architectural mood—dawn, dusk, or overcast. This flexibility allows V-Ray for Rhino users to produce renders that convey specific times of day or weather conditions.
Light Mixing and Color Control
Frame Buffer enables real-time light mixing, giving you full control over scene mood. Adjust the intensity and color temperature of each light without re-rendering.
Try blending warm and cool tones to emphasize materials or create distinct atmospheres. For client presentations, quickly demonstrate how lighting changes can alter perception.
Use this feature to experiment with color grading and highlight focal points. Light mixing adds a powerful layer of creative flexibility to your workflow.
Avoiding Common Lighting Pitfalls
Even with V-Ray for Rhino's advanced tools, lighting mistakes can undermine a scene. Watch out for overexposed highlights, harsh shadows, and unnatural color casts.
Check exposure settings to prevent washed-out images.
Soften shadows by adjusting light size or using area lights.
Neutralize color casts with balanced white point calibration.
When issues arise, compare before-and-after renders to pinpoint corrections. Addressing these challenges ensures your visualizations remain both accurate and visually compelling.
Rendering Settings and Workflow Optimization
Optimizing your rendering workflow is crucial for achieving high-quality results without sacrificing valuable time. Understanding how to select the right render engine, balance quality and speed, automate repetitive tasks, and troubleshoot issues will streamline your architectural visualization process.
Choosing the Right Render Engine
Selecting between CPU and GPU rendering can significantly affect your workflow. CPU engines are ideal for complex scenes with heavy geometry or advanced features, while GPU engines excel at speed for most standard tasks.
Recent benchmark data from leading firms reveals that GPU rendering can be up to 5x faster for interior views, while CPUs remain preferable for massive, detailed exteriors. For a full overview of new capabilities, see the V-Ray 7 for Rhino Features page.
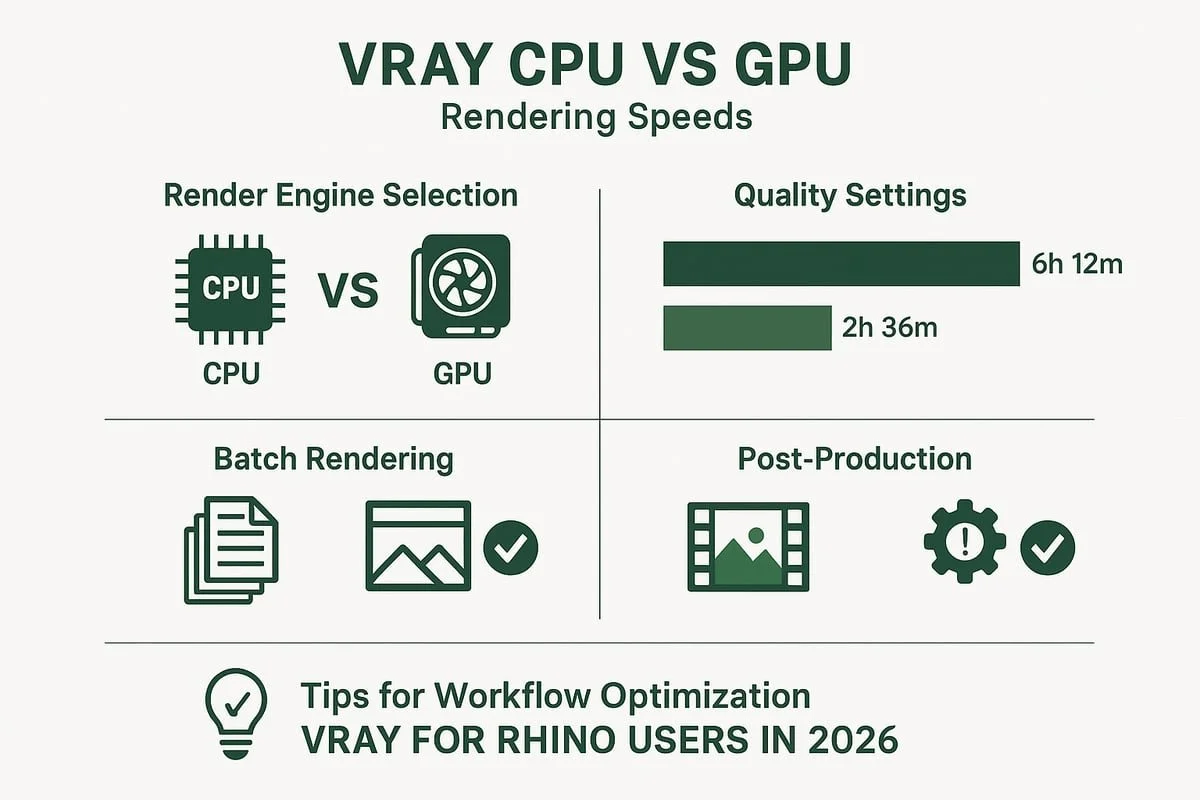
Render Quality vs. Performance: Finding the Balance
Balancing render quality and performance involves adjusting key settings such as resolution, sampling, and noise threshold. High resolution and sampling increase realism but lead to longer render times. Adaptive sampling and denoising tools help maintain quality while reducing noise efficiently.
For example, setting the noise threshold to 0.01 will give crisp results, but raising it to 0.02 can halve render times with minimal visible difference. Use the denoiser in Frame Buffer for post-render cleanup. Striking the right balance ensures your renders are impressive yet delivered on schedule.
Batch Rendering and Workflow Automation
Batch rendering allows you to process multiple views or scenes automatically. Set up batch jobs for overnight rendering or use V-Ray Swarm and distributed rendering to leverage multiple machines. This approach is invaluable for tight project deadlines.
Workflow automation tools can queue scenes, manage priorities, and even notify you when jobs are complete. For large projects, batch rendering ensures consistency and maximizes workstation efficiency, helping teams deliver high volumes of visualizations with minimal manual effort.
Render Elements and Post-Production
Outputting render elements, or passes, in V-Ray for Rhino gives you flexibility during post-production. Use the V-Ray Frame Buffer to separate elements like diffuse, reflection, and lighting, allowing for targeted adjustments in Photoshop or After Effects.
A typical workflow includes exporting these passes, then compositing and color correcting for final presentation. The ability to fine-tune images post-render means you can quickly adapt to client feedback without restarting the process. Render elements are essential for professional, polished results in projects.
Troubleshooting Slow Renders and Crashes
When V-Ray for Rhino slows down or crashes, pinpointing the cause is key. Common bottlenecks include overly detailed geometry, high-resolution textures, and excessive light sources. Use the scene optimizer to find and fix these issues.
Memory optimization tips include reducing texture sizes and simplifying materials. For stubborn cases, split large scenes into smaller sections for separate rendering. Real-world examples show that these strategies can cut render times by half and prevent costly delays in commercial projects.
Creative Applications and Advanced Techniques
Discover how V-Ray for Rhino transforms architectural concepts into captivating visual experiences. This section explores creative workflows, from artistic rendering styles to immersive VR presentations, giving you the tools to elevate your designs and communicate ideas with impact.
Photorealism vs. Artistic Rendering Styles
With V-Ray for Rhino, you can choose between hyper-realistic visualization and stylized, conceptual artistry. Photorealism emphasizes accurate lighting, materials, and textures, making it ideal for client presentations or regulatory approvals. Artistic rendering, on the other hand, allows you to highlight design intent with expressive lines, color washes, or non-photorealistic effects.
For interior spaces, advanced rendering tools like V-Ray for Rhino deliver stunning, impactful results. Explore how Power of 3D rendering for interior design leverages creative styles to inspire and engage clients.
Animation and Walkthroughs
Bring your architectural spaces to life with V-Ray for Rhino’s animation capabilities. Set up camera paths and keyframes to create smooth walkthroughs or flythroughs, helping clients experience a project’s flow and atmosphere before construction begins.
Efficiently rendering animations requires careful planning:
Break scenes into manageable segments
Use instancing for repeated geometry
Optimize materials and lighting for speed
Recent updates, such as those in V-Ray 7 Update 2 Enhancements, introduce AI-powered features and improved scattering, streamlining complex scenes for animation workflows. Animated walkthroughs are now a practical, impressive asset for real estate and design presentations.
VR and AR Integration for Immersive Experiences
V-Ray for Rhino opens the door to immersive visualization. Export high-resolution panoramas or 3D models optimized for VR and AR platforms, allowing clients to explore projects interactively.
Key steps for VR/AR integration:
Render 360-degree images or stereoscopic views
Optimize geometry and textures for performance
Use compatible viewers or platforms for display
Interactive presentations powered by V-Ray for Rhino foster deeper client engagement and understanding. Stay updated on current trends, as immersive experiences continue to shape how designs are reviewed and approved.
Collaborative Workflows and Cloud Rendering
Collaboration is critical for large, distributed design teams. V-Ray for Rhino supports asset sharing and centralized material libraries, ensuring consistency across multiple contributors.
Cloud rendering solutions offer scalability:
Offload heavy renders to remote servers
Use distributed rendering for faster turnaround
Share previews and assets with stakeholders in real time
By leveraging cloud-based workflows, teams can deliver high-quality visualizations even under tight deadlines.
Showcasing Your Work: Portfolio and Marketing Tips
A compelling portfolio is vital for architects and designers. Use V-Ray for Rhino to prepare renders tailored for web, print, or social media, adjusting resolution and color profiles as needed.
Tips for impactful presentations:
Curate a mix of photorealistic and artistic images
Highlight unique design features or lighting moods
Organize images by project type or style
Leveraging the versatility, you can create visually striking materials that attract clients and elevate your professional reputation.
Future Trends and 2026 Innovations
The future is being shaped by rapid advancements in artificial intelligence, real-time visualization, and a thriving global community. Staying ahead means embracing these innovations and leveraging new tools to elevate your workflow and creative output.
AI-Powered Rendering and Automation
Artificial intelligence is revolutionizing V-Ray for Rhino workflows. In 2026, expect features like AI denoising, automated material recommendations, and intelligent scene analysis. These tools dramatically reduce manual effort, letting you focus on creativity instead of technical troubleshooting.
For example, AI-driven denoisers can clean up noisy renders in seconds, while smart material suggestions speed up look development. Scene analysis tools now flag potential issues before rendering even begins, helping you avoid costly mistakes.
To explore how AI is transforming architectural visualization, see AI in architecture rendering. As these technologies evolve, V-Ray for Rhino users will enjoy faster workflows, more consistent results, and greater creative freedom.
Real-Time Rendering and Visualization
Real-time rendering is pushing V-Ray for Rhino into new territory. Tools like V-Ray Vision allow designers to present ideas live to clients, making instant adjustments and receiving feedback in real time. This interactive workflow transforms client meetings into dynamic design sessions.
With real-time visualization, waiting hours for test renders becomes a thing of the past. You can walk clients through spaces, change lighting, or swap materials on the fly. This capability not only accelerates decision-making but also enhances the collaborative process.
Staying Ahead: Training, Resources, and Community
Mastering V-Ray for Rhino in 2026 means investing in continuous learning. The best professionals rely on updated courses, tutorials, and active forums to keep their skills sharp. Resources like V-Ray Academy and Rhino user groups offer structured training and peer support.
Engaging with the community helps you discover new techniques, troubleshoot challenges, and stay informed about the latest updates. Participating in webinars or workshops can expand your network and expose you to real-world case studies.
By prioritizing education and connection, you ensure that your expertise stays relevant and competitive in a rapidly changing industry.
Now that you’ve explored the essentials and discovered how powerful creative rendering can elevate your architectural presentations, you might be thinking about how to bring your own projects to life. Whether you’re an architect, developer, or homeowner looking to make your designs stand out with photorealistic visuals, we’re here to help you achieve results that truly impress. If you’d like expert guidance or want to discuss a specific rendering challenge, let’s connect and see how we can turn your vision into reality.